As background, I have some experience making amigurumi animals and from that I learned how to do a magic circle. You can see that when I'm crocheting in the round, I don't do a proper increase each time around. I personally think it leaves a line in your finished crochet that I'm not a fan of. The downside of this, though, is that my finished work does twist slightly. I can offset some of that when I attach limbs, but it's still going to be visible. And finally, I don't turn my work right-side out. I've read on other blogs that I should be turning out my pieces before sewing them together. Because of how I attach the limbs, I don't do this.
Whew... So onto the good stuff.
Supplies: As much as possible, I use 100% cotton yarn. I want something that will be soft and durable over many washes. I also stay away from using any kind of sewn on eyes or beads just for safety's sake. I've been giving these to little kids who might pull on them or chew on them and so on.
The Feet: I start my dolls at the feet and work my way up from there adding parts until they are finished. For the feet, I start with a magic loop and by either doing dc on one side and sc on the other side- or by using increases and decreases- I get them into a foot-like shape.
The Legs: I keep crocheting in a circle until I have them the length I want. I get two to the same length and then finish one by sewing in the loose ends. With the other, I crochet across the "back" side and link it to the next leg, follow that leg around to the front and then link it on the "front" side to the front of my first leg. I keep building on this new cylinder to make the torso of my doll.
The Torso: I immediately add increases to my torso until I get it to the diameter I want. On this doll, I also worked in slightly larger stitches in the back- maybe dc or hdc- for a row or two until I had a bottom to the doll. I keep building up the torso until I'm ready to add the arms.
The Hands: For this doll, I crocheted a chain of four and then used that to make a row of three hdc (the "fingers" on the hand). At the end of that row, I chained two and then with a sc connected them back to the starting point. I then did a sc two more times across the base of the hand. Voila! One hand.
The Arms: At that point, wanted to keep going and crochet a cylinder for the rest of the arm. I chained one, turned and crocheted in the back loops only of my row until I reached the end and then I kept going by turning my work and crocheting in the front loops of my row. I now had six sc in a circular shape. I built on that round by round until I had my arms the length I wanted them.
I attach my arms to the torso in the same basic way I attach my legs. I crochet the bottom parts of both arms as I'm doing a round. On my second round, I go over the tops of them and they are connected.
The Chest/Neck: At this point, I usually start making decreases until I get to the diameter I want my neck to be. Then, I start increasing again for the head. Pretty simple.
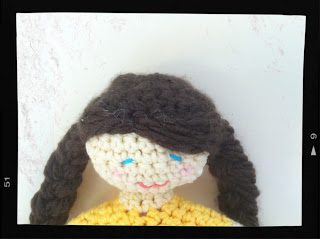
The Face: First I build up the bottom of her head in this flesh-toned yarn. Then, I work on just the face of my doll. I go back and forth in rows until I have the height I wanted for her face (leaving the back alone). At that point, I finish off this color by weaving in my ends. If you saw her at this point, you'd see that she's missing the back of her head completely. That's the last feature I add.
For the expression on her face, I try to keep it simple with embroidery floss. I use a little bit of crayon to get her cheek color.
The Hair: When I'm done with her face, I need to finish the head and add hair. I change the color of yarn I am using to whatever I want to use for her hair and then begin to do a sc all the way around the flesh colored parts of her head. After establishing the new color, I do decreases in this color until I have a head shape, finish stuffing her, and then close her off. Lastly, I add her braids and bangs.
So... I think this is officially the longest post I've written. Hope that some people find it helpful.
Blessings!


No comments:
Post a Comment